Install Help: Smart Alarm
Open the Sim cover to the bottom of the Smart Alarm unit. When setting up/turning on the Smart Alarm unit you will see the blue and yellow lights around the Sim slot. These lights indicate GPS and GSM status.
A: First, ensure the Smart Alarm unit has been charged (Press power button once to check blue lights on the side of the GPS unit. 1 blue light low charge, 4 blue lights full charge). If charged press the power button quickly once to show blue power lights and then quickly once again to turn the torch on. To turn off, quickly press the power button once again. Caution, do not press and hold button as this activates an on-off function.
A: Ensure a working micro Sim card has been installed into Sim slot before turning on. Press and hold the power button for 3-5 seconds. The Smart Alarm unit will emit three beeps, this will indicate the Smart Alarm unit is on. Also, you will see the yellow/blue lights in the slim slot, flashing etc to indicate the GPS/GSM functions is setting up.
The only reason the unit may not turn on is if the battery fail safe has ‘kicked in’. As faulty lithium batteries can be dangerous we have built in fail safes that disarm the main functionality of the battery. This does not mean the unit may not have some partial use (power lights in the side for example may still show in some instances) yet that main functionality maybe prevented. More often than not it means the unit will not power on correctly. In the latter event, should the unit still be in warranty, then we would encourage you to email us so we can arrange a return, testing and replacement as necessary.
A: Press and hold the power button for 3-5 seconds. The Smart Alarm unit will emit five beeps, this will indicate the Smart Alarm unit has turned off.
When a Smart GPS unit won’t switch off it is usually because the unit is trying to communicate (or has just sent) its warning alerts. This is designed to prevent thieves etc gaining entry to your vehicle and turning off the unit before the alerts can be raised.
So what’s happening? In most instances we find that the vibration sensor within the Smart GPS unit is still armed, meaning that when the unit is picked up or the power button is pressed then the system does its job, feels the vibrations, and attempts to send the necessary alerts. Whilst it is doing this, then the unit won’t turn off. Obviously once the alerts are set the unit resets, meaning the cycle of vibration detection, alert continues, resulting in the unit being unabled to be turned off.
To get around this scenario, firstly disarming the vibration and noise sensor within the Smart alarm via the App. Wait 5 minutes and then hold down the power button for 3-5 seconds the unit should then turn off without issue.
The only other reason the unit may not turn off is if the battery fail safe has ‘kicked in’. As faulty lithium batteries can be dangerous we have built in fail safes that disarm the main functionality of the battery. This does not mean the unit may not have some partial use (power lights in the side for example may still show in some instances) yet that the main functionality may falter. Even though counter-intuitive this can result in the unit not turning off on occasion (however more often than not it means the unit will not power on correctly). In the latter event, should the unit still be in warranty, then we would encourage you to email us so we can arrange a return, testing and replacement as necessary.
A: Within the App, there is a function called ‘Alert Horn Setting’, when this function is turned on the smart alarm unit will emit beeping sounds to indicate activity. i.e. If the vibration or listening alarms are activated the unit will beep three times. Also if the smart alarm unit is unable to establish a signal it will intermittently beep until a connection is established.
A: If your Smart Alarm unit will not connect with the AnyTracking App firstly ensure:
- If your Smart Alarm unit will not connect with the AnyTracking App firstly ensure:
- The Sim card installed into the tracker has Text/SMS facilities.
- Sim card has been installed into the Smart alarm unit correctly (Chip on sim faces upwards toward face of smart alarm unit with power button and ‘V’ logo). Cut out on Sim to be to inward, right hand edge of Sim.
- Sim card has credit for text/Sms, Mobile data and call. If you have purchase a 1p mobile Sim card (EE) from us, the Sim should come with £10 worth of credit supplied. If in doubt call 1p Mobile to confirm on 03333 442278
- The GPS unit has enough power (4 blue lights showing to the side of the smart alarm unit, next to the power/Usb output port) and is turned on (press and hold the power button for 3-5 seconds until the unit gives three beeps).
- The Sim card installed into the smart alarm unit has a medium/strong phone signal within the area of setup (to check this you can insert Sim into your phone (if phone unlocked or on same network as Sim)).
After checking these details are correct and you are still struggling to set up then it may be necessary to set the APN on the Smart Alarm Sim card installed into the unit.
To set up the Smart Alarm Sim card APN follow the below instructions:
- From your phone/mobile device send a Text/SMS message to the Sim number you have inserted into the Smart Alarm device. The Text message should read:-
- 123456,sos1#
- Or try:- 123456,sos,(your own mobile phone number)1#
- The Smart alarm unit should then send a return Text/SMS message back to your phone that reads (Your Smart alarm Sim Number) followed by ‘has been set for master number successfully’. If it does not send this message check items a) to e) again accordingly.
- Then once again from your phone/mobile device send a Text/SMS message to the Sim number you have inserted into the smart alarm device. This message is dependent on the network service provider to which your smart alarm SIM is supplied by. Only send the message below that related to this network service provider (note that your sim may have been supplied by the likes of ‘Tesco’, ‘Virgin’, ‘GiffGaff’ etc yet the network service provider will still be one of the below. Contact your sim provider if in doubt):
- Send text/SMS from phone to Sim number in smart alarm reading: apn,everywhere,user,eesecure,pd,secure,plmn,23430#
- Send text/SMS from phone to Sim number in smart alarm reading: apn,three.co.uk,plmn,23420#
- O2 . Send text/SMS from phone to Sim number in smart alarm reading: apn,mobile.o2.co.uk,user,o2web,pd,password,plmn,23410#
- O2 (Pay monthly). Send text/SMS from phone to Sim number in smart alarm reading: apn,wap.o2.co.uk,user,payandgo,pd,password,plmn,23410#
- Send text/SMS from phone to Sim number in smart alarm reading: apn,internet,user,web,pd,web,plmn,23415#
- Vodafone (Pay monthly). Send text/SMS from phone to Sim number in smart alarm reading: apn,pp.vodafone.co.uk,user,wap,pd,wap,plmn,23415#
The Smart Alarm unit should then send a return Text/SMS message back to your phone that reads ‘ Apn set successfully! Reboot System now…’. If it does not send this message check items a)to e) again accordingly.
When you receive the above message the Smart alarm unit should, in most instances, reboot (turn on and off) automatically. You will know the unit had rebooted as it will ‘beep three time’. If the unit does not beep, then simply turn off (hold button for 3-5 seconds and wait for 5 beeps) and then turn on again (hold button for 3-5 seconds and wait for 3 beeps).
From here, go back into your ‘Anytracking APP’. Once logged in go to settings and test the Smart Alarm is connected and online by carrying out a quick test:
- Go to Arm
- Select Vibration sensor alarm
- Press OK
- A message reading ‘Success’ should appear toward the bottom of the screen and if so the GPS is connected and online
N.B Don’t rush the Arming/Disarming/Alarm mode options and only choose one at a time, waiting to ensure you receive a ‘Success’ message each time. Rushing the process can sometimes also result in ‘Current device is off line. Can’t send commands’.
A:Ensure a working micro Sim card has been installed into the smart alarm unit. Also, ensure you have downloaded the App to your phone. Then see the following to check the signal and ensure the smart alarm sim is working:- Look at the blue and yellow light in the sim slot which indicates the unit is searching for a GPS/GSM signal via the sim card. In areas of low or no signal, the unit will be unable to establish a GPS/GSM link. Move the unit to another location with a better signal. When the yellow and blue light start to flash quickly (initial slow flash) this indicate the unit is establishing a link via a good signal and has about to connect. After a short while, these lights will go off placing the unit on standby. Check the app on your phone, once logged in, see the Battery status to the top of the screen, if the status says ‘offline’, turn unit off and on again and repeat in a strong signal area. Note: If you have purchased a 1p mobile sim with your unit then the current phone operator is EE. We suggest contacting EE to check signal strength in your area should problems persist (this may ultimately result in the requirement to replace your sim for a provider that works in your area).
A: This is often an indication of a poor signal location/area of the Smart alarm unit. If the smart alarm unit has been hidden in an item such as a toolbox etc within the back of the van then this can block the signal necessary for connectivity with the App. Re-locate the Smart alarm unit to another area on the inside of the panel/bodywork of the van (whilst trying to avoid fitting to plywood panelled or insulated area of the van as these areas can also block signal) to allow for a stronger signal and connectivity. Also, some areas of the country/your local vicinity may suffer from poor/no mobile telephone reception. As the Smart alarm Sim needs a good localised signal to connect with the App on your phone, then on occasion, if this is not available connectivity will be lost. If this persists we recommend trying another Sim, in the Smart alarm unit, from a different phone/network provider.
A: The magnetic door sensor only operates in conjunction with the GPS unit and not the audible siren alarms. As there is only one GPS smart alarm unit provided with the Vanolarm package then only one magnet door sensor can be used. The magnetic door sensor can be seen as a little superfluous to the utility of the Vanolarm system. Ultimately best practice when using the Vanolarm system would be to employ the Noise/Sound/Voice and vibration security settings of the device. These are designed to dissuade thieves from attempting entry to the vehicle and report attempts to the smart alarm system. These settings will also send alerts if someone should gain entry to the van and open the doors also. As the magnetic door contacts only operate when the doors are opened or prised open then the other security settings should have already been activated before this happening. Of course, if the user feels the 2nd line of defence necessary then the magnetic door sensor can still be used. NB We do not recommend the GPS unit to be installed to the inside of opening doors. Firstly if entry is gained the GPS units may be seen easily, stolen or thrown away negating the additional GEOfence and tracking security. For this reason, we recommend hiding the GPS units somewhere less obvious in the vehicle. Secondly, most side and rear van doors are often slammed shut then on occasion the GPS unit can come loose from its holding sleeve (fixed to the vehicle), fall and subsequently become damaged.
The above said, there is an overall secondary use for the magnetic door sensor in terms of protecting the smart alarm unit itself. When installing the smart alarm unit many clients also locate the magnet, adjacent to the unit, within the same location. The reason for this is if you have armed the ‘door sensor alarm’ within the app, yet have not armed the vibration sensor or forgot to set the noise sensor, then if a thief manages to get into the vehicle, finds the smart alarm and decides to remove it, then the magnetic sensors note this and alerts are still instantly raised to your phone. Ultimately adding yet another layer of protection to your security measures.
A: Vanolarm was extensively designed not to be ‘hard wired’ into the vehicles main electrical & Van locks system. One of the principle reasons behind this was a 2nd layer of Van security, preventing the system being turned off etc via ‘Key hacking’.
For those with vehicle electrical know how it is possible to establish a hard wiring system that can run independently from the vehicles main electrical system and subsequently also help prevent key hacking yet .
This said however it is still not recommended to hard wire the main Vanolarm smart GPS unit to your vehicle unless managed by a ‘charge timer/max capacity’ system that can ensure the battery is not overcharged and is inline with the battery charging detail advised within written instructions provided with your purchase.
If hard wiring the Vanolarm GPD/Smart alarm unit, this need to be done using the mini USB port, ensuring input of no more than DC 5V = 2amp. NB The units battery capacity is 4500mA.
The Vanolarm App reports current battery charge status/life as well as messaging you when the battery life is down to 10%. Most users also simply charge the unit as and when necessary during travelling via a USB (cigarette) socket and cable in the cab area.
Please be mindful that placing rechargeable batteries on constant charge can reduce the overall life expectancy of the battery. In all cases, avoid excessive charging voltages and overcharging. This can lead directly to critical situations and the system should therefor only ever be charged in line with the written instructions provided. Batteries placed on permanent charge may void your warranty.
The Audible alarm units run off 3 x AAA batteries (supplied with unit), the key fob gives off an audible warning when these batteries are ready for replacement. Many users choose to replace with rechargeable batteries to save costs over time however standard AAA are more than adequate. Yet please be aware of the overcharging issues which can come with such batteries.
Finally please note that ‘setup, arming/disarming’ etc is not available whilst the smart alarm is plugged into the mains/recharging, yet preset ‘tampering’ notification alerts can still be sent whilst in this state.
When using the Smart alarm unit and working out battery life, think of it as being not too dissimilar to your Smart phone device. Logically the battery on standby can last a very long time. When in use most smart phone batteries will last 1-2 days, however with heavy use, mobile tracking and mobile data on batteries can be drained within 12 hours.
This is very true with the Smart Alarm unit from Vanolarm, although batteries do last some what longer (30-60 days) . Intervals for uploading data greatly reduce battery life, so if you have switched on ‘1m intervals for uploading location data, have your, vibration alarm on constantly , noise sensor alarm on constantly then your battery will drain very quickly (as well as using more the normal data) and can last as little as 2-3 days.
With different people using vanolarm in different ways it’s difficult for us to cover every scenario when advising best use for longevity of batteries. Yet here are some suggestions:
- Want Alarm protection but not bothered about Geofencing (mid battery life):- In settings on the App change Interval for uploading data to 12 hours, switch off/disarm vibration sensors (this is covered by the Audible alarm units anyway), Switch on/off noise sensor only as and when vehicle left overnight or in vunerable locations. In Alarm mode switch on ‘SMS and Platform Alarm’. Logout of App. When wanting to turn on noise alarm send text/sms instead of using app. To turn on text ‘ non#’ to the sim number in the smart alarm from your phone. To turn off text ‘hoff#’
- Want Alarm protection and Geofencing (mid battery life):- In settings on the App change Interval for uploading data to 10 mins, switch off/disarm vibration sensors (this is covered by the Audible alarm units anyway), Switch on/off noise sensor only as and when vehicle left overnight or in vunerable locations. In Alarm mode switch on ‘SMS and Platform Alarm’. Logout of App. When wanting to turn on noise alarm send text/sms instead of using app. To turn on text ‘ non#’ to the sim number in the smart alarm from your phone. To turn off text ‘hoff#’
- Want Alarm protection via vibration tech only and no GEO fencing (long battery life) :- In settings on the App change Interval for uploading data to 12 hours, switch off/disarm vibration sensors (this is covered by the Audible alarm units anyway), Switch off noise sensor. Switch on/off vibration sensor only as and when vehicle left overnight or in vunerable locations. In Alarm mode switch on ‘SMS and Platform Alarm’. Logout of App. When wanting to turn on noise alarm log in and then out of app Arming and disarming vibration control accordingly.
- Want Alarm protection via vibration tech only with GEO fencing (Mid/long battery life) :- In settings on the App change Interval for uploading data to 10 mins, switch off/disarm vibration sensors (this is covered by the Audible alarm units anyway), Switch off noise sensor. Switch on/off vibration sensor only as and when vehicle left overnight or in vunerable locations. In Alarm mode switch on ‘SMS and Platform Alarm’. Logout of App. When wanting to turn on noise alarm log in and then out of app Arming and disarming vibration control accordingly.
One of the most common battery drainage issues when using a Vanoalarm unit is the system being unable to connect with either the GPS or GSM tracking network. If you have placed your Smart unit in the rear of the vehicle and there are no windows or roof lights the GPS tracker does not have clear view of the satellites necessary for operation in this event the unit automatically switches to GSM tracking. Although GSM tracking does not require line of site to the satellites as it works off the mobile phone network it does require a connection to that network, The normal metal skin of a vehicle will not normally prevent this however if the skin is double lined (pillars etc), has high levels of insulation or the smart alarm is hidden in tool boxes, surrounded by tool boxs/metal items this can obviously block a mobile phone signal. If this is the case the GSM will be constantly looking for a signal, using data and a lot of battery life. We suggest relocating the Smart alarm unit to a more suitable location within the vehicle accordingly.
Pure Battery life is also usually effected by one of two issues.
Firstly, charging. Shallow discharges and recharges are better than full ones, because they put less stress on the battery, so it lasts longer. When your battery is discharging, battery manufacturers recommend that you only let it reach 50 percent before topping it up again. While you’re charging it back up, you should also avoid pushing a lithium-ion battery all the way to 100 percent. If you do fill your battery all the way up, don’t leave the device plugged in. Instead, follow the shallow discharge and recharge cycle we just mentioned. This isn’t a safety issue: Lithium-ion batteries have built-in safeguards designed to stop them causing damage if they’re left charging while at maximum capacity. But in the long term, electronics will age faster if they’re constantly plugged in while already charged to 100 percent.
Secondly, environment. This tends to relate to cold environments. When temps fall below freezing, these energy sources’ electrical performance declines, and when conditions are cold enough, they can fail to transfer any charge. Therefore when re-charging, the batteries/devices should be brought up to room temperature prior to plugging in the recharge cable, ensuring strong/efficient recharging and battery life. When your batteries internal temperature drops below freezing (32 degrees F), the lithium cells are unable to accept the same amount of charging current (warmth) as they do when warm. Therefore you shouldn’t charge your batteries when they have been taken straight out of a cold/freezing environment. If the batteries have been charged when too cold, this will have damaged the internal performance of the battery, which generally results in overall reduced performance thereafter.
When we designed Vanolarm, we were aware that many van and tool thefts were due to thieves breaking into houses and stealing keys or cloning keys via new key hacking technology.
The above lead us to design the system so that if the key fob/remote was either lost or stolen, then then full alarm unit could not simply be turned off using said key fob/remote.
With this in mind and in order to set the full alarm system, the key fob only controls the Audible alarms and the App only controls the Smart Alarm unit. We find unfortunately though that some clients believe they are arming/disarming the full alarm system by using the key fob/remote only. Consequently if they have not Disarmed the smart alarm via their App also then it will beep (horn setting) and send notification should the Smart alarm sensors not be turned off before travelling.
It should be noted that the Smart Alarm has its own internal vibration sensor and the ‘Vibration sensor alarm’ in the App reflect this and not the vibration sensors in the Audible alarms (which are only controlled via the fob/remote).
With the above in mind, we suggest best practice for the majority of installation is to simply use the ‘Noise listening function’ within the App disarming/Arming it as and when necessary. Also Disarm/Arm the Audible alarm units using the key fob at the same time. Thus meaning if the Audible vibration alarms are activated the listing (noise sensor) in the smart alarm hears them and sends a notification accordingly.
NB If choosing to use the above best practice method then we recommend to firstly disarm all the Smart alarm sensors via the App (one at a time, wait for success message between each and then wait 5 mins before moving on) then once disarmed you can use the ‘Noise sensor alarm’ Arm/Disarm feature as and when necessary
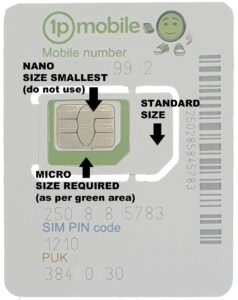
The smart unit accepts Micro Sim cards only. Often when you receive a modern day Sim card it will arrive in a plastic cut out format such that there are three Sim card in one (standard, micro and Nano). When pushing the micro Sim card out from the larger cut out area ensure you don’t push out the Nano sized card (the smallest). The size you require for the micro Sim which is the middle sized card. If the Nano sized card is inserted into the Smart unit, it will be too small, loose and could result in short circuiting of the receptor board. Please therefore be sure not to insert the nano sim and insert the correct micro sim card size accordingly.
NB Short circuiting of the receptor board can result in the Smart device failing and connectivity with the App may not be possible.
When designing Vanolarm consideration was made with regards to Key Fobs being stolen, cloned, key hacked or lost. If any of these events happened we still wanted the vehicle to be protected.
With the above in mind we felt it important that all Vanolarm functionality should not simply be able to be switch off via the fob. Consequently to Disarm/Arm the Smart alarm unit the user needs to do this via the App. The latter ensures if the Key Fobs being stolen, cloned, key hacked or lost then the vehicle is still protected, via additional vibration/sound/Geofence and live tracking technology. As such the Audible alarms need to be Arm/Disarmed by the fob and the smart alarm needs to be Armed/Disarmed via the App.
A:Ensure a working micro Sim card has been installed into the smart alarm unit. Also, ensure you have downloaded the App to your phone. Then see the following to check the signal and ensure the smart alarm sim is working:- Look at the blue and yellow light in the sim slot which indicates the unit is searching for a GPS/GSM signal via the sim card. In areas of low or no signal, the unit will be unable to establish a GPS/GSM link. Move the unit to another location with a better signal. When the yellow and blue light start to flash quickly (initial slow flash) this indicate the unit is establishing a link via a good signal and has about to connect. After a short while, these lights will go off placing the unit on standby. Check the app on your phone, once logged in, see the Battery status to the top of the screen, if the status says ‘offline’, turn unit off and on again and repeat in a strong signal area. Note: If you have purchased a 1p mobile sim with your unit then the current phone operator is EE. We suggest contacting EE to check signal strength in your area should problems persist (this may ultimately result in the requirement to replace your sim for a provider that works in your area).
When we set up our Smart GPS and APP we are often very eager to quickly get on with the process so that we can test the functionality of the Vanolarm unit and consequently can ignore some of the principle set up requirements. As battery power can obviously effect the overall performance of the smart GPS unit in relation to operation and signal reception strengths it is important to ensure the unit has initially been charge for 8hrs (as per set up instructions). If not charged this can result in incorrect online status reports, such as current battery power % status (fooling us into thinking the unit is actually charged when it is not). Also we may feel that because we have power (regardless of percentage) the phone will be able to connect to GPS and phone networks. Unfortunately if less that 10% power the unit can struggle to make connectivity with either phone, GSM or GPS signals (hence again always why we should charge our units for 8hr on set up and keep good levels of power going forward.)
As we know phone signals and GPS signal strengths vary greatly due to our location and the location of our devices. As well as with our normal phones this is very true also with regards to the Vanolarm smart GPS device. For example we can be travelling down the road with our phones showing a nice strong phone (reception) signal and the very next minute there is no signal at all, or we enter a multistory car park and our GPS (google maps) tracking disappears. We can even stay in one spot and one minute we have strong signal and the next hardly anything. These circumstances have to be considered when reviewing any ‘Offline’ instances reported via the Anytime App (especially when first enabling/setting up the App and Smart GPS device and placement of the unit within our vehicles).
Many will 1st try to set up their devices in their homes/offices, giving little attention to signal strength. For a successful and stress free set up process we therefore always recommend moving to an area where you have good to very good phone reception and if setting up Geofencing etc move near a window for good GPS reception. So once we are sure we are in an area of good/strong signal strength (check Sim port on smart device and ensure blue and yellow lights are still not flashing slowly) why are we still seeing an ‘Offline status report’?
When the App is operating it uses three link detection protocols. This means every 4 minutes the App looks at the signal strength/data links currently being received from the Smart GPS unit itself. It does this three times within a 12 minute period, each time reporting back to the App weather or not the Smart GPS unit has signal/data link. If after the three attempts the App does not see (at any point) any phone signal/data links coming back from the Smart GPS device then at this stage it reports the unit as being ‘offline’. This means that on occasion and especially when travelling, even though the Smart GPS device may now have mobile connectivity the report coming in from the App may say ‘Offline’, yet in fact at that moment in time connectivity has been re-established and all is functioning correctly.
So why does the App employ a delay system which effectively can give 12 delays in actual ‘offline’ reporting. Well firstly its down to protecting battery life, unlike your mobile phone which is usually charged daily we want to ensure the Vanolarm unit has a strong life expectancy. Every time a link detection takes place it uses up battery life, if this detection took place constantly as per your phone then battery life could be as little as one day also. In addition, in real life, when travelling especially, if the App detected the smart alarm was off line every minute or so it would result in numerous offline status notification further depleating the batteries. Obviously we need to know the offline status for when we park up at night etc, to ensure if we park in an area of no connectivity we can move the vehicle to an area where the Alarm will be able to report accordingly, this keeping the vehicle protected.
With all the above in mind ‘How should we approach Offline status reports?’.
- When setting up in haste, try to avoid taking too much notice to the ‘offline status’ report if move from location to location during setup. Pay attentions to the blue and yellow light status within the sim slot area instead. However if in a static location and you receive a ‘Offline status’ report then we suggest moving (to a stronger signal location) as there are clearly connection issues in your location and this will cause difficulties when setting up.
- If travelling and receiving offline status reports remember you could have entered an area with no/low connectivity and this can naturally be expected from time to time.
- If parked up overnight or for a long time and you receive ‘Offline reports’ then the smart unit is struggling to make connectivity to the mobile networks due to phone signal strength in your area or location of smart unit within vehicle (signal being blocked by surrounding apparatus/body work etc). To ensure vehicle is fully protected by Vanolarm we recommend parking in a location with a stronger phone signal or moving smart alarm location within vehicle for better reception.
- If parked up overnight or for a long time and you receive one or two ‘Offline reports’ during this time then the smart unit may be in an area of fluctuating phone signal strength (when the phone signal drops out from time to time). To ensure vehicle is fully protected by Vanolarm we recommend parking in a location with a stronger/more consistant phone signal.
Although most users chose to only use the vibration sensors in the Audible alarm units, for added protection some also chose to use the additional vibration sensor fitted within the Smart Alarm unit itself. This Vibration sensor only has 4 levels of sensitivity settings (unlike the 7 in the Audible alarm units). To set the sensitivity of the Vibration sensors in the Smart GPS unit you need to use SMS/Text commands (there are no setting from within the APP). To change the setting (which are defaulted at most sensitive) from your phone send a text/sms message to the Sim number of the sim card inserted in your Smart GPS device. Text the following ‘ von,4# ‘ for least sensitive, ‘ von,3# ‘ for next least sensitive, ‘ von,2# ‘ for 2nd most sensitive and ‘ von,1# ‘ for most sensitive. Unit should text a message back to your phone reading ‘Level 2 vibration sensor alarm On’ etc, subject to the level you have requested
If simply using the vibration technology, GEO fencing or Magnetic door sensors then there is no need to consider the distance between the Smart GPS device and the Audible siren sensors. This said if using the noise sensor within the Smart GPS device to listen out for the Siren from the Audible alarm units then there are some best practice protocols to consider.
Firstly check your noise sensor can hear your sirens. Go to the App and Arm the Noise sensor. Wait for a success message to ensure the Smart alarm sensor had been activated and then wait a further minute prior to testing by setting off the Audible siren alarm accordingly. Place each unit 1m away from each other when testing (allow at least 1 min between each test. We recommend only testing using in App messages to ensure phone signal delay does not complicate matters).
If there are issues with the noise sensor not sending alerts then follow the following instructions:-
From your phone send a text to the sim number of the sim card inserted into your Smart GPS device, text should read ‘ vols,65# ‘ the unit should then text back a message reading ‘ vols:65 ‘ (this confirms the instruction has been accepted). Go to your App, Disarm the noise sensor (ensure success message), wait one minute and then Arm noise sensor again. Then repeat above testing. Once an alert has been sent it can take a couple of minutes for the system to reset, so please allow a couple of minutes rest time prior to re-testing (otherwise alerts may not be sent).
Once the noise sensor is proven to work we recommend placing the smart GPS alarm between 140cm and 200cm from each Audible siren alarm to ensure best performance. The minimum distance between units should be 300mm and the maximum 240cm.
Why is distance important? Well its due to the decibel parameters set within the Smart GOS noise sensor. To reduce false alarms from ambient noise outside the vehicle then its necessary to manage the decibel limits the noise sensor listens too. If we move the 115db siren too close or too far away from the smart Gps noise sensor then these consequential decibel range will vary and the noise sensor may not (although still very probable ) hear the sirens accordingly.
If you are unable to meet best practice locations then we suggest several tests in other locations prior to fully relying on the noise sensor alone.
To ensure the Vanolarm system can raise the alerts via text, calls or in App messages there is a need for the Smart alarm unit to be connected to a mobile network.
In some areas around the country the mobile signals can fail due to no masts in the area, heavy network usage, very low signal strength or signal being blocked by building etc. As a backup system the Smart GPS Vanolarm unit is designed to give you notice if any of these ‘no/low signal’ issues occur. As the unit is constantly searching for signal, it can on occasion, incur repeated ‘non connectivity’ problems given ‘no/low signal’ issues, in this event the unit will give out 3 beeps (subject to the horn being armed from within the App) to warn you that you are in an area which means you may not receive the desired notification etc should the sirens be activated.
When a Smart GPS unit won’t switch off it is usually because the unit is trying to communicate (or has just sent) its warning alerts. This is designed to prevent thieves etc gaining entry to your vehicle and turning off the unit before the alerts can be raised.
So what’s happening? In most instances we find that the vibration sensor within the Smart GPS unit is still armed, meaning that when the unit is picked up or the power button is pressed then the system does its job, feels the vibrations, and attempts to send the necessary alerts. Whilst it is doing this, then the unit won’t turn off. Obviously once the alerts are set the unit resets, meaning the cycle of vibration detection, alert continues, resulting in the unit being unabled to be turned off.
To get around this scenario, firstly disarming the vibration and noise sensor within the Smart alarm via the App. Wait 5 minutes and then hold down the power button for 3-5 seconds the unit should then turn off without issue.
The only other reason the unit may not turn off is if the battery fail safe has ‘kicked in’. As faulty lithium batteries can be dangerous we have built in fail safes that disarm the main functionality of the battery. This does not mean the unit may not have some partial use (power lights in the side for example may still show in some instances) yet that the main functionality may falter. Even though counter-intuitive this can result in the unit not turning off on occasion (however more often than not it means the unit will not power on correctly). In the latter event, should the unit still be in warranty, then we would encourage you to email us so we can arrange a return, testing and replacement as necessary.
We assume you have seen Q4 on this page ‘How do I turn the smart alarm unit on’?
If your smart unit will not turn on after charging there is a chance the unit may have incurred a battery fail safe event. If the unit detects an issue with the battery it is designed to switch off the main battery functionality for the unit (although the torch and side lights may still operate). This is designed to reduce risk of catastrophic battery failure instances in term of health & safety. The result of which an internal diode burns out to prevent the main functionality option.
Battery fail safe issues mainly occur due to incorrect charging events. You can learn more about that here under Q13 (see Pure Battery life section) above
Regrettably if the unit has incurred a battery fail event then it will not function thereafter and as the battery is none replaceable then a new unit is required. Obviously if the latter has been incurred whilst the unit is still under warranty then you can return the unit for test and if the fault is sustained then a new replacement unit will be sent out to you.
Many Vehicles in the market place will not have a bulk head between the Cab area and the rear of the vehicle. In these instances we recommend additional Audible alarm units (which act as door sensors also) be purchased to ensure the full vehicle is protected.
Vanolarm ultimately was designed to protect the rear of a vehicle and the tools and possessions within. In this manner all the units are hidden away in a secure place. This security is compromised when there is no bulk head in place and this is why we recommend the additional protection to the Cab area.
This said should the user feel they want the added protection to their cabs area even though they have a bulk head, then the Extra Audible alarms can still obviously be purchased (please note however if the bulkhead if well insulated this can prevent the Smart alarm units in the rear of the vehicle communicating with the Audible Alarms in the Cab. In this instance the Audible alarms only retain the siren capabilities)